

A new update for OSD-XMB has been released, Sony ‘s iconic XrossMediaBar (XMB) interface, which originally appeared on the PSP and PlayStation 3 , has been adapted for the PlayStation 2 console by developer HiroTex.
Based on DanielSant0s’ Athena Env and inspired by the XtremeEliteBoot+ dashboard , this version offers a simple and functional design, with optimized navigation for controllers and D-pads.
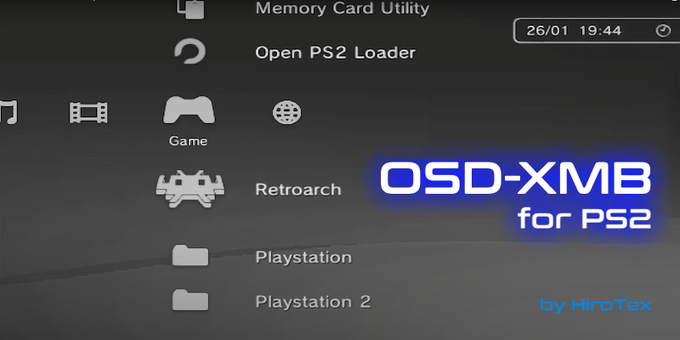
The interface supports a customizable plugin system, with predefined modules divided into different categories. The User section allows you to access the OSDSYS browser, update the interface, and change general settings.
To correctly install this release, you need to perform a clean installation: do not overwrite the previous version’s folder, but delete it and replace it entirely with the new one.
Among the main new features in this version is the new network functionality, managed by the “Network Settings” plugin, which allows you to view and activate or deactivate the connection. The “Update Game Resources” plugin has also been introduced, allowing you to download the artwork of PS1 and PS2 games.
The graphical interface has received improvements, particularly in the appearance of the clock, and some dashboard elements, such as dash_clock, dash_logoand dash_submenu, which can now be customized via themes.
The XML system has been optimized, and a guide is included to easily create a JSON Sub Menu plugin. Finally, several bugs have been fixed, including localization issues, dialog buttons, and the display of the options menu above the SAS APPS plugin.
Characteristics
- Plugin System : Allows you to create custom plugins to display elements on the dashboard. The default plugins are:
User Category
- Return to Browser : Returns to the OSDSYS browser.
- Refresh Interface : Resets the OSDXMB interface to update the settings.
Settings Category
- Game Settings : Adjust various global POPS and Neutrino settings.
- System Settings : Configure the interface language and confirmation button.
- Theme Settings : Customize XMB colors, fonts, and icons.
- Time Settings : Change clock settings.
- Display Settings : Configure the video mode and aspect ratio.
- Security Settings : Enable or disable parental controls.
Game Category
- File Explorer : Explore files on your USB drive or in your default application folder. Allows you to run ELF files.
- Memory Card Utility : View save data on Memory Cards.
- OpenPS2Loader : Example plugin to launch a version of OPL.
- Retroarch : Example plugin for running RetroArch.
- PlayStation 1 : List of games in the POPS folder on USB.
- PlayStation 2 : List of games in DVD or CD folders on USB.
Booting PS2 Games from USB
- The application automatically lists all ISO games present in the DVD or CD folders at the root of the USB drive.
- You can customize the settings for each game by opening the Options menu , selecting the game, and then About .
- To save your changes, press the confirmation button.
- The Show Logo and Show Debug Colors options can be configured globally in the Game Settings section .
Running PS2 games from disc
- If there is a PS2 DVD in the player, the app will automatically recognize it and select it in the Game category .
- You can customize game names by adding .cfg files to the CFG folder , using the syntax:
Title=Nome del Gioco
Booting PS1 Games from USB
- The app automatically scans the POPS folder on your USB to list all .VCD files in the PlayStation 1 section .
- The .VCD file name will be used as the game name.
- If no matching ELF file is found , it will be generated automatically.
- You can set special settings for POPS the same way you set options for PS2 games, via the Options menu .
- Global options are found in the Game Settings section .
Running ELF files
- Custom ELF files can be launched via File Explorer or using dedicated plugins.
- File Explorer launches ELF files without arguments, while plugins allow you to configure advanced parameters.
Installation instructions
- Copy the neutrino folder to Memory Card Slot 1 or 2 if you intend to use it to launch games from USB with Neutrino (
mc0:/neutrino/ormc1:/neutrino/). - Place the OSDXMB folder in the root of the USB drive and launch the file
OSDXMB.ELFto run the application. - Place the RetroArch
coresand foldersinfoinsideAPPS/retroarch.
Changelog
- Network features.
- Added “Network Settings” plugin:
- Allows you to view and enable/disable the network connection.
- Added “Update Game Resources” plugin:
- Allows you to download artwork for identified PS1 and PS2 games.
- Added “Network Settings” plugin:
- Improved the appearance of the clock in the interface.
- Some XMB dashboard assets can now be customized via themes:
dash_clockdash_clock_outlinedash_loaddash_logodash_pbardash_submenu
- Improved XML system.
- Included is a guide to learn how to create a simple JSON Sub Menu plugin.
- Bug fixes:
- Fixed some issues with localization strings.
- Fixed issues with dialog button strings.
- Fixed an issue with the options menu appearing above the SAS APPS plugin.
Source: Github, x.com ,biteyourconsole.net
Comments