

A new update has been released for FPSLocker, the tesla overlay developed by developer
masagrator for modded Switch consoles that allows us to set a custom FPS through graphics API detection.
The overlay appears on the screen during gameplay and allows you to change various parameters in real time, including FPS, automatically adapting the selected value to the graphics technology used by the title you are running.
The official repository, FPSLocker Warehouse , continues to collect the YAML files needed for the overlay to work, containing data on games locked at 30 FPS and instructions for updating patches that allow you to overcome this limit.
The maximum supported size for YAML files remains 32 KB, but this may be increased in future updates.
The update improves the stability and compatibility of the system for converting FPSLocker configurations into assembly patches, fixing several technical issues that, while not affecting existing files, made the writing process more complex.
Fixes have also been introduced for the LDRB and LDRH instructions, which no longer return errors when using fixed offsets, while the TBZ and TBNZ instructions now finally support the use of jump labels.
This release now handles all conditional branching, improving the flexibility of the patching system. Finally, the Title ID base has been updated to align with the current state of the game catalog.
Requirements
- Custom Firmware Atmosphère
- SaltyNX fork, version 1.4.0+
- Tesla Environment: ovlloader + Tesla Menu
Usage
Supported languages: English, German, French, Russian, Brazilian Portuguese, Simplified Chinese.
The overlay runs in two modes:
When the game is running
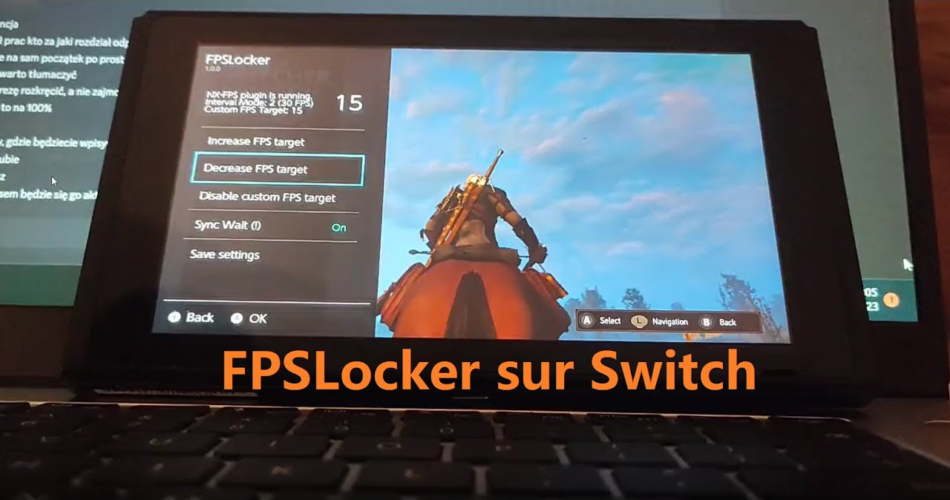
If the game is supported by SaltyNX and you have installed everything correctly, you will see the menu where the first line indicates that the NX-FPS plugin is running.
Short explanation: The best approach if you intend to run 30 FPS games at higher FPS:
- Connect your Switch console to the internet, open FPSLocker, and go to
Advanced Settings, then pressCheck/download config file. If your game and version are compatible with the FPSLocker Warehouse, the menu will update to display the optionConvert config to patch. Press it, restart the game, and then change the FPS target in FPSLocker. - Go to Advanced Settings, if it says “Set/Active/Available buffers: 2/2/3”, press
Set buffering, chooseTriple (force), go back to the FPSLocker main menu, pressSave settings, and restart the game.
Explanation of each option and information:
Interval Mode– This is used by the NVN API to set the limiter to 30 FPS (2) or 60 FPS (1).Custom FPS Target– This is used to lock the game to a certain FPS. If the game uses proprietary engine FPS locks, it may not be able to unlock higher than 30 FPS without additional patches.Big number on the right– Shows how many frames have passed in the last second for the currently running game. This is to confirm that the lock is working as intended.Increase/Decrease FPS target– Only displays in portable mode. Change the FPS target to 5. The minimum is 15 FPS, the maximum is 60 FPS.Change FPS target– Only displayed in docked mode. Displays a table with different FPS values, from 15 to 60 by default, with the option to expand to 120 FPS.Disable custom FPS target– Removes the FPS target. Since it is not possible to predict which range mode is expected at this point, it is up to the user to manipulate the FPS to restore the correct range before disabling the FPS target.Advanced settings– Submenu consisting of:- If the game uses NVN
Window Sync Wait– This is a dangerous setting that, if disabled, can crash the game, but in some games it can have the benefit of disabling double-buffered vsync at the expense of minor graphical issues (check the list of compatible games at the bottom of the README). Use with caution. It won’t appear if the game isn’t using double-buffering.Set Buffering– If the game uses a buffering method other than Double, this option will display and allow you to force the game to run at any buffering method other than the original one (so, for example, you can’t change Double Buffer to Triple Buffer). Lowering the buffer is only recommended for games that perform nearly perfectly at 30 or 60 FPS but suffer from poor framepacing or significant input lag. Forcing double buffering in games with uneven performance will cause severe FPS drops. It can only be applied at game startup, so after changing the buffering, you must save the settings in FPSLocker and restart the game.
Explanation:Set/Active/Available Buffers- Set: How many buffers have been set using . If the game isn’t using it, it will be 0. Games can use this to set the buffer value to a value lower than the reserved space allows. If it detects that this is being used and is less than the Available buffers, the “(force)” option can be used next to the default option. Without it, the default settings will be restored.
nvnWindowSetNumActiveTextures(force) - Active: How many buffers the game is actually using.
- Available Buffers: The number of buffers actually provided to the NVN network. We can use this information to force games to use all buffers when they don’t.
- Set: How many buffers have been set using . If the game isn’t using it, it will be 0. Games can use this to set the buffer value to a value lower than the reserved space allows. If it detects that this is being used and is less than the Available buffers, the “(force)” option can be used next to the default option. Without it, the default settings will be restored.
- If the game uses Vulkan
Set Buffering– Switch from double buffer to triple buffer. Lowering the buffer is only recommended for games that perform nearly perfectly at 30 or 60 FPS but suffer from poor framepacing or significant input lag. Forcing double buffering on games with uneven performance will cause severe FPS drops. It can only be applied at game startup, so after changing the buffering, you must save the settings in FPSLocker and restart the game.
Convert config to patch file– If a correct configuration file exists for this game and version, you will have the option to convert it into a patch file that will load the next time you run this game. The patch is saved inSaltySD/plugins/FPSLocker/patches/*titleid_uppercase*/*buildid_uppercase*.binDelete patch file– If a correct configuration file exists for this game and version, you will have the option to delete the patch file so that it will not be loaded the next time you run this game.Check/download config file– Checks the Warehouse repository to see if the configuration for this game and version exists. If it exists, it is downloaded and checked to see if it matches the one on the SD card. Otherwise, the overlay will remove the existing patch and configuration file, and the user will have to manually convert the new configuration to a patch file. Error 0x312 means we’ve received an unexpected file from GitHub. Any other error code means something is wrong with your connection or your GitHub server.Halt unfocused game– Some games don’t suspend when the Switch is in the main menu. Enabling this option moves the game to the infinitely looping thread responsible for displaying frames in the main menu. Enabling this option can cause various issues depending on the game, so be sure not to use it carelessly.
- If the game uses NVN
Save settings– Saves the profile for the currently running game, which will be automatically loaded by the plugin at startup the next time. Don’t use this if you’ve disabled sync waiting and haven’t tested it properly, as it may cause crashes. The profile is saved inSaltySD/plugins/FPSLocker/*titleid_uppercase*.datDisplay settings– Submenu relating to the display refresh rate. Consisting of:Increase refresh rate– Only displays in laptop mode. Changes the display refresh rate up to 60Hz. It is locked on OLED units.Decrease refresh rate– Only displays in laptop mode. Changes the display refresh rate up to 40Hz. It is locked on OLED units.Change refresh rate– Only displays in docked mode. Choose your display refresh rate from the list.Display Sync– When enabled, all three of the above options are unavailable, the display refresh rate is only changed when the game is running and matches the refresh rate with the FPS target.Retro Remake Mode– This option is only shown for people using Lite with an O display (first revision only). This is because Retro Remake displays require a special approach to changing the refresh rate, and the first version of SUPER5 spoofs the ID of the existing display, making it impossible to detect which one is in use. Therefore, the user must enable it manually if using a SUPER5 display. All other Retro Remake displays are detected automatically.InnoLux 2J055IA-27A (Rev B1)Retro Remake SUPER5Docked Settings– Submenu relating to the display refresh rate of external displays. Not accessible for Lite units. Consisting of:myDP link rate– It will report either mode. HBR mode does not allow you to exceed 75 Hz at 1080p. More information at the bottom of the readme file.HBRHBR2Config ID– What is the name of the configuration file used to store the settings for the currently connected display? You can find the file in the folder.SaltySD/plugins/FPSLocker/ExtDisplaysAllowed refresh rates– You can manually control and change the refresh rates enabled for the currently connected external display. These are 40, 45, 50, and 55 Hz. By default, 50 is enabled, while everything else is disabled.Display underclock wizard– Automatically cycles through refresh rates from 40 to 55. The user is prompted to press the required button to confirm that it is working. If left untouched for 15 seconds, it switches to the next refresh rate. After checking all refresh rates, go to the menu to review the results.Allowed refresh ratesDisplay overclock wizard– Only displays if the maximum refresh rate reported by the external display is 70Hz or higher. It automatically cycles through refresh rates from 70Hz to the maximum supported by the display, with a limit of 120Hz. The user is prompted to press the required button to confirm that it is working. If not pressed for 10 seconds, it cycles to the next refresh rate. After checking all refresh rates, you go to the menu to review the results.Allowed refresh ratesFrameskip tester– Allows you to check whether the display is displaying the currently used signal at its native refresh rate. Many displays can support, for example, 50Hz, but still display things at 60Hz. Instructions on how to use it are provided when you select this menu. This menu is also available in laptop mode.Additional settings– Submenu with options related to the operation of FPSLocker/FPSLocker patches in docked mode. Currently, you can choose between:Allow patches to force 60 Hz– Some FPSLocker patches force 60Hz to fix frame-pacing issues with 30 FPS cinematics. When this change occurs, the game pauses for 4 seconds before continuing. By default, this option is enabled. Disabling it will only apply the FPS lock, without changing the refresh rate or causing any lag.Use lowest refresh rate for unmatched FPS targets– For example, for a 60Hz display, the 35 FPS target may not have a corresponding available refresh rate. Enabling this option will result in the lowest enabled refresh rate in the menu. This option is disabled by default, which will result in the 60Hz setting.Allowed refresh rates
When the game is not running
There are two submenus to choose from (if you are using the OLED model, you will be automatically redirected to the games list):
Games list
It will list your installed games (up to 32), and the first option is the “All” submenu.
Within each submenu, you’ll find two options:Delete settings– will delete the file created by the “Save Settings” optionDelete patches– will delete the file created by the “Convert configuration to patch file” option
Display settings– You can read in the previous section.Force English language– If you prefer to use English, this option will force the overlay to use it. This is achieved by automatically modifying the executable, so after updating the overlay to the latest version, it will be disabled.
About changing the refresh rate in laptop mode
This space sheds light on some important aspects related to changing the screen refresh rate in laptop mode.
The Switch’s OLED displays require color gamma correction whenever the refresh rate is changed. To achieve a result as faithful as possible to the original experience, the OLED panel’s registers are modified to adjust the gamma curve.
However, since these registers operate in very large steps, it is not possible to achieve perfect adjustment, so slight discrepancies in the colors may be noticed.
The most obvious case occurs with 60% brightness set at 45 Hz. Furthermore, the lower the refresh rate selected, the lower the maximum brightness achievable will also be: this is due to the way in which the register responsible for gamma intervenes at maximum brightness.
From the various feedback received, only one user with an LCD panel reported a slight flickering in the lower left corner of the screen at 40 Hz.
The affected panel was an InnoLux P062CCA-AZ2, but other users with the same screen did not experience the problem, including the developer himself. No other issues were reported.
Retro Remake displays need some time to adapt to the new signal. For this reason, the refresh rate is applied with a slight delay.
If you try to change it too quickly, you may encounter a black screen, which can be resolved by putting the console into standby, turning it off, or restarting it. If you encounter any problems, we recommend reporting them in the “Issues” section so that SaltyNX can increase the delay directly.
It was decided to limit LCD and Retro Remake displays to a minimum of 40Hz, as going below this threshold brings no tangible benefits and could introduce instability due to underclocking the screen.
For OLED panels, the minimum limit is set at 45 Hz, since the display’s behavior is already anomalous at 40 Hz.
LCD screens can be pushed up to 70 Hz without any noticeable problems, but for now the upper limit has been left at 60 Hz. Users with original panels have reported defective images above 75 Hz. OLED panels, on the other hand, exhibit problems even above 60 Hz.
If display sync is turned off, your custom frequency will not reset after sleep mode.
Changing the refresh rate also affects the smoothness of OS animations and the Tesla overlay, which appear slower at lower refresh rates.
The introduction of custom refresh rate support required a change in the way games’ configuration files are handled. Therefore, you’ll need to re-download all configurations from the FPSLocker Warehouse repository if you want full compatibility with the new refresh rates.
Finally, the software author assumes no responsibility for any damage caused by changing the refresh rate.
Whenever you access the screen settings, you’ll be notified by a message reminding you that you’re entirely responsible for accessing them. You’ll need to accept the warning to continue.
About changing the refresh rate in docked mode
The upper limit was set at 120Hz as it represents the highest refresh rate supported by the original dock and non-OLED Switch consoles, making it the most universal standard.
Many displays are capping at a maximum of 75Hz at 1080p, likely due to interference in the connection between the Switch and the dock. This issue causes the HBR2 (High Bit Rate 2) training implemented in the console’s operating system (HOS) to fail, forcing the connection to operate in HBR mode.
In HBR with 2 lanes, the effective limit is around 180MHz, slightly higher than required for 1080p at 75Hz. The issue could stem from the console itself and/or the dock.
Additionally, when operating in HBR mode, audio may not be transmitted to the dock if the refresh rate exceeds 60Hz at 1080p. Attempts to manually force HBR2 training will result in a signal reset, which HOS then attempts to restore, thus blocking any manual attempts.
Tests have shown that HOS system applets become unstable starting at 100 Hz. This means, for example, that if a running game attempts to open the user selection applet, it may crash.
Furthermore, some games exhibit instability even without the intervention of applets: for example, Batman: The Enemy Within crashes if closed when the refresh rate exceeds a certain threshold.
Sync Wait
In these games, you can disable double-buffer vsync by disabling the Window Sync Wait option within FPSLocker.
- Batman – The Telltale Series (The Warehouse patch enables triple buffering, so you don’t need to use this option)
- Pokémon Legends: Arceus
- Pokémon Scarlet
- Pokémon Violet
- Sonic Frontier
- The Legend of Zelda: Tears of the Kingdom (the Warehouse patch enables triple buffering, so you don’t need to use this option)
- Xenoblade Chronicles: Definitive Edition
- Xenoblade Chronicles 2
- Xenoblade Chronicles 3
- Xenoblade Chronicles X
Changelog
- Fixed several issues converting FPSLocker configurations to assembly instruction patches (no configurations were affected until October 17, 2025, but these bugs made the writing process slightly more complex).
LDRBThe and instructionsLDRHnow no longer generate errors when the instruction includes a fixed offset.- The instructions
TBZnow support the use of gotoTBNZlabels . - All conditional branches are now supported.
- The Title ID database has been updated to reflect the current status.
Source: Github.com
Comments